Please ensure that you have Python 3.12 installed on your machine. Guides for installing Python can be found on the Python website.
Rust
Morphik requires the Rust toolchain for optimized performance operations (binary quantization, base64 encoding, text processing). Install Rust using rustup:
macOS/Linux
Windows
curl --proto '=https' --tlsv1.2 -sSf https://sh.rustup.rs | sh
After installation, restart your terminal or run:
source $HOME/.cargo/env
Download and run the installer from rustup.rs, or use winget:
winget install Rustlang.Rustup
Verify the installation:
rustc --versioncargo --version
PostgreSQL
Morphik requires PostgreSQL with the pgvector extension for vector storage and similarity search capabilities. Follow the installation instructions for your operating system:
macOS
Ubuntu/Debian
Windows
On macOS, you can use Homebrew to install PostgreSQL and pgvector:
brew install postgresql@14brew install pgvector
Start the PostgreSQL service:
brew services start postgresql@14
Create a database and user for Morphik:
createdb morphikcreateuser -s postgres
These commands create a database named “morphik” and a superuser named “postgres” that the application will use to connect.
Install PostgreSQL from the official repositories. We recommend version 14. Other versions may work, but haven’t been extensively tested!
During installation, make note of the password you set for the postgres user.
Install pgvector:
Open pgAdmin (installed with PostgreSQL)
Connect to your PostgreSQL server
Right-click on “Extensions” and select “Create > Extension”
Select “pgvector” from the dropdown and click “Save”
Create a database for Morphik:
Right-click on “Databases” and select “Create > Database”
Name it “morphik” and click “Save”
After installation, verify that PostgreSQL is running correctly:
psql -U postgres -c "SELECT version();"
You should see the following output:
version ------------------------------------------------------------------------------------------------------------------------------<Your postgres version and some compilation details>
Additional Dependencies
Some system-level dependencies might be required for processing various document types:
macOS
Ubuntu/Debian
Windows
# Install via Homebrewbrew install poppler libmagic
libmagic: This is included in the python-magic-bin package which will be installed with pip
If you encounter database initialization issues within Docker, you may need to manually initialize the schema:
psql -U postgres -d morphik -a -f init.sql
Docker (required for background services)
Docker is used to spin up auxiliary services automatically (e.g., a
local Redis container for Morphik’s task queue). Install Docker
Desktop (macOS/Windows) or the Docker engine (Linux) and make sure the
daemon is running.
Optional: Running Local Models
Morphik supports fully local inference for both embeddings and completions through two powerful engines:
Lemonade SDK - Windows only, optimized for AMD GPUs/NPUs
Ollama - Cross-platform (Windows, macOS, Linux)
Both are pre-configured in Morphik. For detailed setup instructions, see our Local Inference Guide.
2
Cloning the Repository
To get started with Morphik, we need to first setup the server. This involves cloning the repository, installing the dependencies, and the running the server. You are just a few steps away from accurate, agentic RAG over your multi-modal data!First, let’s clone the repository from GitHub.
Install or build llama-cpp-python (Metal on Apple Silicon, wheel on Windows)
Launch the server via uv run start_server.py
You only need to run ./install_and_start.sh the first time to set up
the environment. For future sessions, activate your project directory
and simply start the server with:
uv run start_server.py
4
Setting up the Server Parameters
At this point, you may want to customize the server - such as use a different model, enable or disable certain features, etc. - you can do so by editing the morphik.toml file.Morphik uses a registered models approach, which allows you to define hundreds of different models in one place and reference them throughout your configuration. This makes it easy to mix and match models based on your needs (e.g., smaller models for simpler tasks). You can find more details about configuration here.The installer copies .env.example to .env automatically if it’s
missing. After the script finishes, open .env to add any API keys (e.g.
OPENAI_API_KEY) or secrets you need. You can tweak morphik.toml
anytime to switch completion/embedding models, adjust chunking, or enable
advanced features.
5
Launching the Server
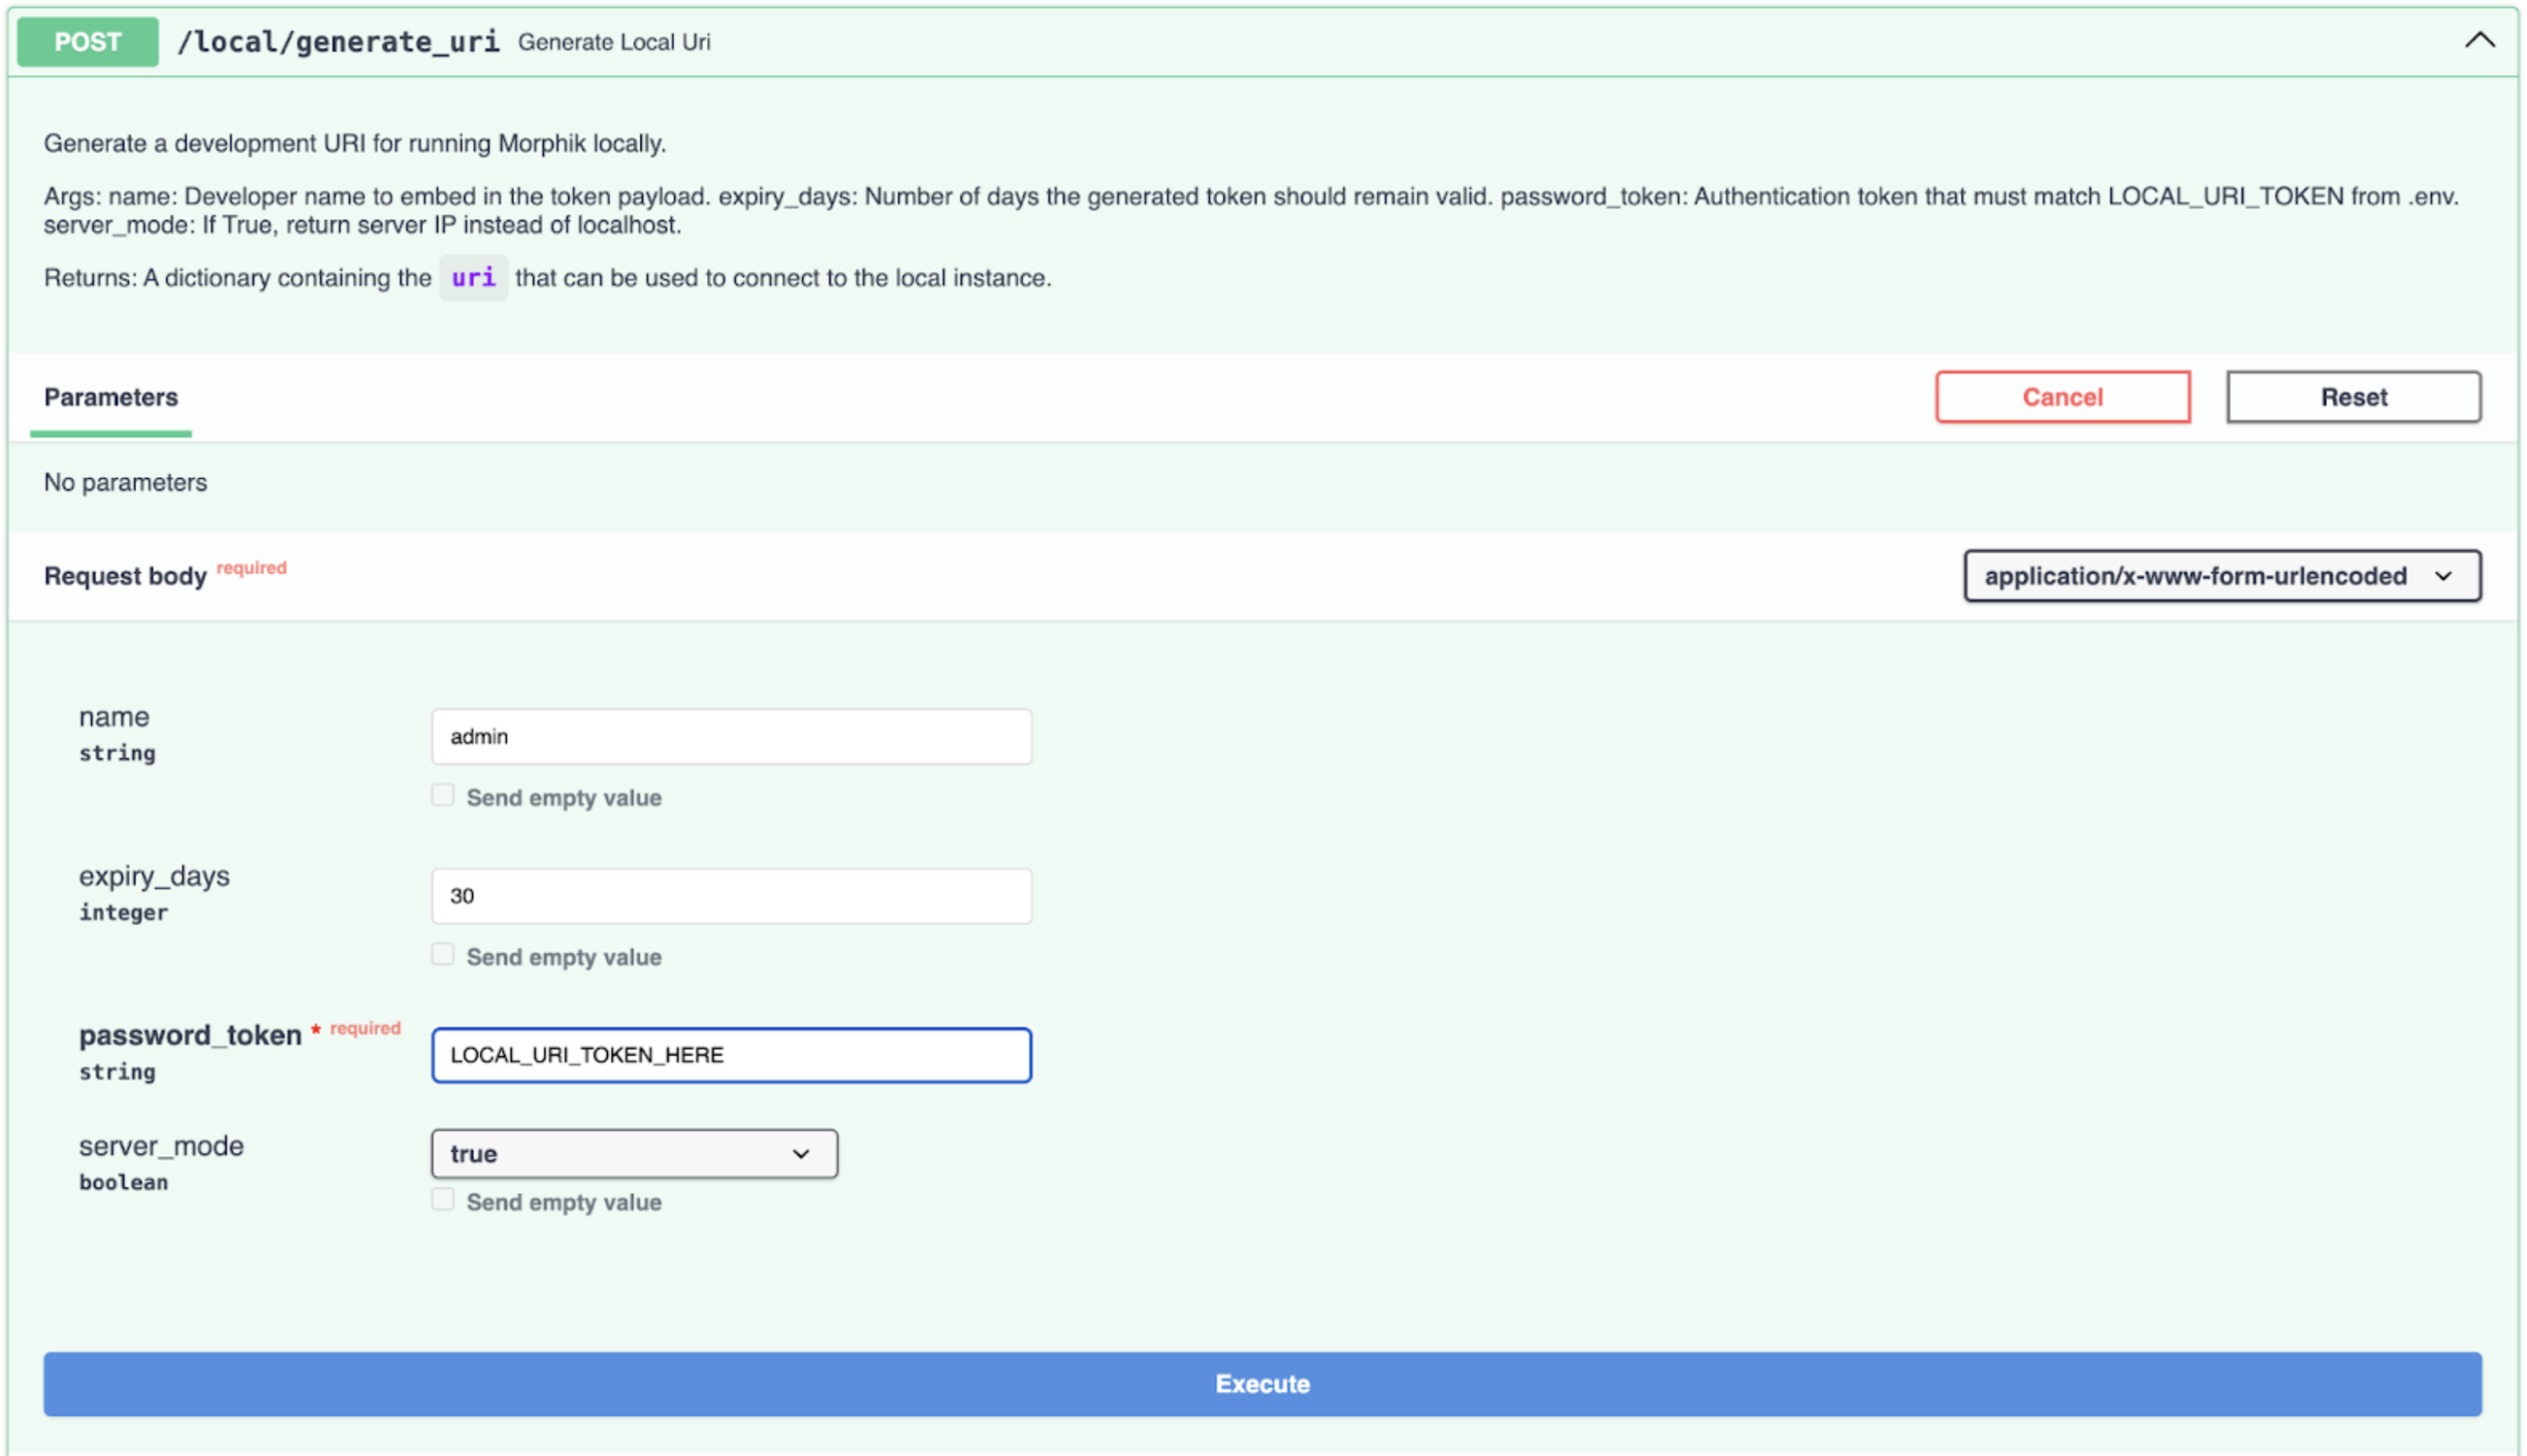
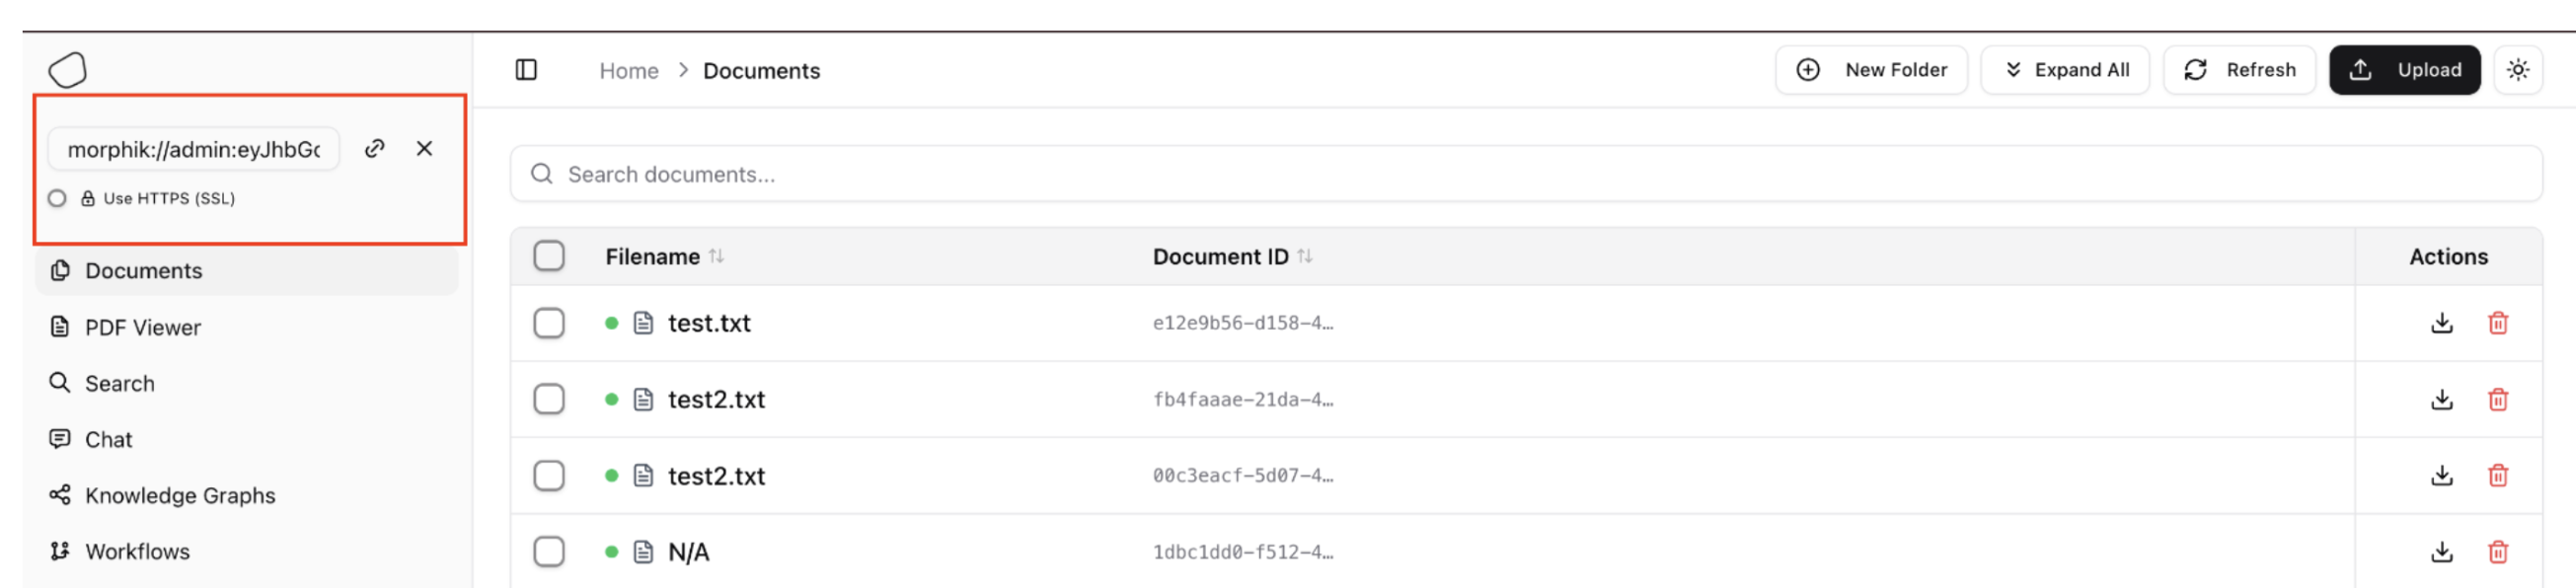
You are now ready to launch the Morphik server! Just run the following command to start the server.
uv run start_server.py
You should see the following output:
INFO: Started server process [15169]INFO: Waiting for application startup.INFO: Application startup complete.INFO: Uvicorn running on http://localhost:8000 (Press CTRL+C to quit)
This means that the server is running on http://localhost:8000. You can now interact with the server using the API or the Python SDK.
Morphik provides a streamlined Docker-based setup that includes all necessary components: the core API, PostgreSQL with pgvector, and Redis for task queuing.
If you are using an Apple Silicon (M-series) Mac, we highly recommend using the Direct Installation method instead of Docker. GPU passthrough is not supported via Docker on Apple Silicon, which can significantly impact performance.
Multimodal Embeddings and GPU RecommendationsMorphik achieves ultra-accurate document understanding through advanced multimodal embeddings that excel at processing images, PDFs, and complex layouts. While Morphik will work without a GPU, for best results we recommend using a GPU-enabled machine.The installer will ask if you want multimodal embeddings, and can be turned on and off later.To manually adjust multimodal embeddings, edit morphik.toml:
[morphik]enable_colpali = false # Set to true when GPU is available
Set-ExecutionPolicy -Scope Process -ExecutionPolicy Bypassiwr -useb https://raw.githubusercontent.com/morphik-org/morphik-core/main/install_docker.ps1 -OutFile install_docker.ps1; .\install_docker.ps1
Run the installer from the folder where you want Morphik to live (for example ~/morphik-core). The script writes docker-compose.run.yml, .env, morphik.toml, and the helper scripts (start-morphik.* / stop-morphik.*) into the directory where you run the command.
This video demonstrates the installation flow where we select “No” for GPU support and “Yes” for the Admin UI. The initial startup took approximately 3-4 minutes without GPU. Note that with multimodal embeddings enabled, the initial startup may take longer.The script handles all setup tasks including:
Prompting for your OpenAI API key (optional - press Enter to skip)
Setting up authentication (optional but recommended for production)
Offering to install the Admin UI (optional but recommended)
Copying the Admin UI bundle directly from the Morphik image (with a GitHub fallback) when you opt in, so the UI launches even if you haven’t cloned the repo
Generating start-morphik.* and stop-morphik.* helpers so you can restart or clean up services safely later
Starting all services
During installation, you’ll be prompted:
To enter your OpenAI API key (optional - press Enter to skip and configure later)
To set a LOCAL_URI_PASSWORD for authentication:
Skip for local-only access: Press Enter to enable auth bypass (bypass_auth_mode=true)
Set for production/external access: Enter a secure password to keep authentication enabled (bypass_auth_mode=false)
Whether you’d like to install the Admin UI (recommended for easier management)
Morphik supports 100s of models including OpenAI, Anthropic (Claude), Google Gemini, local models, and even custom models! You can configure your preferred provider in morphik.toml after installation.
After installation:
macOS/Linux
Windows (PowerShell)
# To restart Morphik later (auto-detects UI if installed)./start-morphik.sh# To stop all services and clean up containers/networks/volumes./stop-morphik.sh# (Runs docker compose down --volumes --remove-orphans with any active profiles)
# To restart Morphik later (auto-detects UI if installed)./start-morphik.ps1# To stop all services and clean up containers/networks/volumes./stop-morphik.ps1# (Runs docker compose down --volumes --remove-orphans with any active profiles)
Use the generated ./stop-morphik.sh (or ./stop-morphik.ps1 on Windows) whenever you need to shut Morphik down. It automatically includes the UI profile if installed and runs docker compose down --volumes --remove-orphans, so no containers or networks linger. After stopping, update morphik.toml as needed and restart with ./start-morphik.sh.
Scroll down to find the /local/generate_uri endpoint in the API docs
3
Generate your connection URI
Click on the endpoint to expand it
Click “Try it out”
Fill in the request parameters:
name: A descriptive name for this connection (e.g., “admin”)
expiry_days: How long the token should remain valid (default: 30)
password_token: Your LOCAL_URI_PASSWORD from your environment
server_mode:
Set to true if you want to access Morphik from outside the server
Set to false for local access only (uses localhost)
Click “Execute”
The response will contain a secure connection URI that includes authentication tokens for your client applications.
The generated URI contains authentication tokens and should be kept secure. Anyone with this URI can access your Morphik instance with the permissions embedded in the token.
Once you have generated a connection URI, you can use it to connect to Morphik through:Option 1: Admin UIIf you have the Admin UI installed, you can paste your connection URI directly in the UI:The URI field is highlighted in red, showing where to paste your morphik:// connection string.Option 2: Python SDK
from morphik import Morphik# Initialize Morphik with your connection URImorphik = Morphik("morphik://admin:eyJhbGc...") # Use your generated URI# Ingest a filedoc = morphik.ingest_file(file_path="document.pdf")doc.wait_for_completion()# Query the ingested contentresponse = morphik.query("What is Morphik?")print(response) # "Morphik is the most accurate end-to-end RAG system"
Option 3: TypeScript/JavaScript SDK
import Morphik from 'morphik';import * as fs from 'fs';// Extract the token from your URI// URI format: morphik://name:token@hostconst uri = "morphik://admin:eyJhbGc..."; // Your generated URIconst token = uri.split(':')[1].split('@')[0];// Initialize Morphik clientconst morphik = new Morphik({ apiKey: token, baseURL: 'http://localhost:8000' // Adjust based on your server_mode});// Ingest a fileconst file = fs.createReadStream('document.pdf');const doc = await morphik.ingest.ingestFile({ file });// Wait for processingawait new Promise(resolve => setTimeout(resolve, 5000));// Query the contentconst response = await morphik.query.generateCompletion({ query: 'What is Morphik?'});console.log(response.completion); // "Morphik is the most accurate end-to-end RAG system"
What is Morphik? Morphik is the most accurate end-to-end RAG (Retrieval-Augmented Generation) system, designed to understand and process multi-modal documents with exceptional precision.
Option B — Local DevelopmentFor developing and testing changes to Morphik:
# Clone and enter the repogit clone https://github.com/morphik-org/morphik-core.gitcd morphik-core# Start development environment./start-dev.sh
This builds the Docker image locally and starts all services.To include local inference models, see our Local Inference Guide for setting up Ollama or Lemonade SDK.
• Change models – Edit morphik.toml to switch between different models. See the [registered_models] section for available options.• Environment variables – Customize settings in .env file (API keys, database connection, etc.)• Persist data – Docker volumes automatically persist PostgreSQL data and uploaded files across restarts.
You can customize your setup by creating a .env file:
JWT_SECRET_KEY=your-secure-key-here # Important: Change in productionOPENAI_API_KEY=sk-... # Only if using OpenAIHOST=0.0.0.0 # Leave as is for DockerPORT=8000 # Change if needed